Installing gallery-dl
Installing gallery-dl takes only a few minutes, configuring gallery-dl takes a lifetime. (Ancient Chinese proverb)
- Install the latest version of Python using the yellow button at the top of python.org/downloads/.
- Open Command Prompt by typing cmd in the taskbar search box and hitting Enter.
This Python command makes sure pip, setuptools, and wheel are up-to-date. (These are recommended for properly installing gallery-dl.)py -3 -m pip install --upgrade pip setuptools wheel
installs/upgrades to the latest version of gallery-dl.py -3 -m pip install --upgrade gallery-dl- Find the folder containing gallery-dl.exe and put its path in the Windows PATH environment variable.
Congrats, you are now set up to use gallery-dl.
Try entering gallery-dl --version. If it doesn’t output a version number like 1.26.8 then check if you did Step 5 correctly in the FAQs.
Installation FAQs
What is Command Prompt…
You’re familiar with using Windows’ graphical user interface. Somewhere buried in your folders is the best web browser of all time, firefox.exe. You could click through 📁 folder icons and double click on the Firefox icon to run it. But you probably use a shortcut icon on your Desktop so you don’t need to rummage through folders.
If you right click the shortcut icon and click Properties you will actually see the filepath to firefox.exe highlighted in the Target option: "C:\Program Files\Mozilla Firefox\firefox.exe". This is how Windows finds and runs firefox.exe when you click on the shortcut icon.
In contrast, Command Prompt is one of Windows’ command-line interfaces; a specific kind of text-based user interface that interprets commands typed by the user. If you want to run Firefox from the command line you would type out the filepath that you saw in the Shortcut properties and then hit Enter.
…and what is PATH?
The %PATH% variable is like our shortcut icons but for the command line. It’s just a list of directories. If you try to run a program without telling Windows what directory it’s in, then it will check inside of all the directories listed in PATH.
So putting the directory path C:\Program Files\Mozilla Firefox into PATH would let you run firefox.exe with just the command firefox.
Now Firefox isn’t really meant to be run like this. However gallery-dl, like most Python programs, is designed to be used from a command-line interface and we added its folder to PATH so we can run it with just gallery-dl.
How do I add Python scripts to PATH?
Most Python scripts, including gallery-dl, get installed to the same directory. Open File Explorer and enter %APPDATA%\Python in the address bar. From here open the folder of whatever version of Python you have and go into the Scripts folder. Now click in the address bar and copy this directory path.
Now type environment variables in the taskbar search box and hit Enter. This should open up the Advanced tab of the System Properties dialog. In here click Environment variables… which will open another dialog. Under User variables for <username> click the variable named Path and then the Edit… button opening yet another dialog.
Finally click New and press Ctrl+V to paste the directory path you copied. Now click OK→OK→Apply to save these changes.
Understanding commands.
gallery-dl has no graphical user interface, it uses the command-line interface, so you should probably have a general understanding of how commands work.
The commands you typed into the terminal to install gallery-dl may look like cryptic incantations to you. Believe it or not you can break down the contents of every command into just two concepts: Options and Arguments.
In fact you see options and arguments every time you watch YouTube. Take a look after the question mark in this URL https://www.youtube.com/watch?v=SanTjOArUt4&t=20m49s
The first option is v, short for “video.” Its argument is SanTjOArUt4, the ID of the video you want to watch. When you load this URL, the option–argument pair gets sent to a YouTube server where some sort of program processes it and sends back the video you requested.
There’s also the t option whose argument is 20m49s which asks YouTube, “Pretty please start the video at 20:49 so I can see a cute lava crab.”
What’s important here is that you don’t need to know how the code behind YouTube works to be able to use YouTube, you only need to know what options are available to you and what sorts of arguments each option takes. Every program has its own set of Options to learn so let’s take a look at gallery-dl’s.
Using gallery-dl
The syntax of a gallery-dl command is fairly simple. Just call gallery-dl with any URLs you want to download from.
gallery-dl [OPTIONS...] URLs...For example
gallery-dl https://twitter.com/ui_shig/media https://twitter.com/pakosun/mediawould download every image from the media tabs of Shigure Ui’s Twitter followed by Pako’s Twitter.
There are two ways of setting options: command-line options and configuration files which are in JSON format.
Command-line Options
gallery-dl --help will output a list of command-line options to the terminal. You can write this output to a text file with gallery-dl --help > C:\path\to\file.txt. You can also find this list in the GitHub documentation.
In this list each option is preceded by one or two hyphens, while the argument(s) an option takes are represented in all-caps. Some options don’t take any arguments, like --zip, since you either zip your files or you don’t.
gallery-dl --no-skip -p "IL0V3_4M3!" --destination E:\vtubers\mamas -u sHaHaHark https://twitter.com/ui_shig/media https://twitter.com/pakosun/mediaWe’ve added 4 options to our gallery-dl command from earlier. Notice a few things here:
- All the options come before any URLs
- Options are immediately followed by their argument(s), if any.
- As long as the above is true, options can come in any order.
Configuration File Options
Using lots of command-line options can get unwieldy pretty quickly. Thankfully, options can be set in bulk in JSON files and then passed to gallery-dl with -c path\to\file.json. gallery-dl also checks these directories for configuration files and automatically loads them if found.
- C:\Users\<username>\gallery-dl\config.json
- C:\Users\<username>\config.json
- C:\Users\<username>\AppData\Roaming\gallery-dl\config.json
Besides setting options in bulk, configuration files also allow you to set options that only apply to certain websites or even specific pages within a website.
Command-line options override configuration file options. For example you could set login info for your main Twitter account in a config file, but override it and log in to a different account with -u USER and -p PASS.
If you are already familiar with JSON you can probably read through the Configuration File Options* documentation just fine. If not, there is an example config file and walkthrough later in this guide.
* Unfortunately GitHub isn’t formatting the Configuration File Options page properly as of March 2024 and it’s difficult to read now. I recommend using docutils to generate a more readable HTML file that you can open in your browser.
- press Ctrl+Shift+S on the GitHub page to save configuration.rst
- Install docutils with
py -3 pip install docutils docutils C:\path\to\configuration.rst C:\save\it\here\configuration.html
examples!
Some options to get you started:
-d, --dest, --destination PATH
Tells gallery-dl to start its folder tree in PATH.
gallery-dl --dest "C:\Users\sHaHaHark\hololive" "https://twitter.com/ZedGawr/media"This would start a Twitter folder inside of C:\Users\sHaHaHark\hololive. So files would be saved in C:\Users\sHaHaHark\hololive\twitter\ZedGawr.
-c, --config FILE.json
This will load any additional configuration files you may want to use.
gallery-dl -c "C:\Users\sHaHaHark\gallery-dl\config.json"-i, --input-file FILE.txt
Downloads from the URLs found in FILE (separated by spaces or newlines). If you have a habit of opening lots of tabs of art, get an extension that lets you copy those URLs so you can paste them in a .txt file for gallery-dl.
gallery-dl -i "C:\Users\sHaHaHark\Desktop\tweets.txt"-u USERNAME and -p PASSWORD
Some sites (like Twitter) require you to log in to access pages you want to download from.
gallery-dl -u sHaHaHark -p "IL0V3_4M3!" https://twitter.com/Scanling3/mediaIt’s usually a good idea to put your password in quotes if it contains special characters. If your password contains quotes, put a backslash in front of each. If your password contains a backslash, put another backslash in front of it.
--write-log FILE.txt
Download logs will be written to FILE.txt based on your configuration file. If you have no logging configuration, this file will be blank.
gallery-dl --write-log "C:\Users\sHaHaHark\gallery-dl\log.txt" https://www.pixiv.net/en/users/70473638/illustrationsA common use for log files is to see failed downloads. You’ll see more about this in the Configuration Options section.
--download-archive FILE.sqlite3
Record all successfully downloaded files or intentionally skipped files in FILE and skip downloading any file already recorded in it.
gallery-dl --download-archive "C:\Users\sHaHaHark\gallery-dl\archives\nijie.sqlite3" "https://nijie.info/members_illust.php?id=705266"Download Archives aren’t .txt files, but SQLite databases. This means you will need to install SQLite to use this option. SQLite files will be automatically generated for you by gallery-dl if they don’t already exist.
--zip
Stores downloaded files in a .ZIP archive per gallery.
gallery-dl --zip https://twitter.com/ordan/media https://twitter.com/abara/mediaWill create two .ZIP archives in \twitter, ordan.zip and abara.zip.
Command-line Options Example
A gallery-dl command using several options might look like this. Let’s walk through it.
Microsoft Windows [Version 10.0.19045.4170]
(c) Microsoft Corporation. All rights reserved.

C:\Users\sHaHaHark>gallery-dl -d "E:\hololive\fan art" -i Desktop\pixiv.txt --zip -c configs\filename.json configs\metadata.json https://catbox.moe/c/z1tmmq
1. -d "E:\hololive\Fan Art"
This option tells gallery-dl to put all downloads in the E:\hololive\Fan Art directory.
Take note that I wrapped the filepath argument in quotes because the Fan Art folder
contains a space in its name. If there were no quotes, -d would think you gave it two
arguments: E:\hololive\Fan and Art which isn’t a valid filepath.
I recommend getting in the habit of wrapping filepaths in quotes if you use spaces in folder and file names.
2. -i Desktop\pixiv.txt
This is telling gallery-dl to download from the URLs in pixiv.txt which lives on my Desktop.
This is the first time you’ve seen a relative filepath. When you open cmd.exe, notice that the prompt will say C:\Users\sHaHaHark>.
The prompt always shows the “current working directory.” You can reference any folders in the current working directory without typing out the full filepath by continuing where the prompt leaves off.
In this example you can imagine the full path as C:\Users\sHaHaHark\Desktop\pixiv.txt.
3. --zip
This will create ZIP archives for all the downloads. This option takes no additional arguments. An option that takes no arguments is sometimes called a flag.
4. -c configs\filename.json configs\metadata.json
This option is loading two config files that will affect how gallery-dl downloads things. The
-c option is taking two relative filepath arguments here.
5. https://catbox.moe/c/z1tmmq
This is our one and only URL argument which comes after all of our options.
Technically, since we gave gallery-dl some URLs in -i Desktop\pixiv.txt it wouldn’t
complain if we didn’t pass it a URL here. But this is where any extra URLs would go if we wanted to
add more.
Overwhelming Option Overload
gallery-dl has a lot of options you will never use, the selection is eye-watering. Only look in the docs for an option if you think you need it, that’s the mindset I would carry.
You may also start to realize that the documentation is not very clear in a lot of places; unfortunate for such a powerful tool. Truth be told there is still a lot I don’t know about gallery-dl either. The best thing to do is to just test an option out to see if it does what you think it will do. That’s the only way you’ll learn.
You have a few tools at your disposal to help you try options out.
Ctrl+C
When you run a command, you may want or even need to stop it early. Spamming the keystroke sequence Ctrl+C in the terminal will interrupt the command and end it early.
Why Ctrl+C? Long story short, it’s an ASCII standard that hasn’t changed since the days of sending telegrams. Its use as a copy shortcut came later.
-s, --simulate
The -s option runs your command as usual without downloading files. This is helpful for testing different options, like to see if your filenames are correct, if your terminal output is color coded how you want it, if your filters work, etc.
-v, --verbose
The -v option makes gallery-dl assault your screen with a wall of text of everything it is doing. No one knows what it all means, but with some critical thinking and a lot of luck you might spot something in there that gives you a hint at what is or isn’t working.
Either that or show it to a wizard who can help you troubleshoot.
--write-log FILE and --error-file FILE
I think these will be fairly self-explanatory from their description in --help.
Ultimately, it might take you a while to get used to using command-line programs like gallery-dl. It doesn’t help that programmer lingo gets thrown around a lot.
I hold firm that you don’t need to be a programmer to use one, but learning Python 101 might help you a lot in understanding some of the words you’ll be seeing.
Baby steps. Remember that just giving gallery-dl URLs will download every file on those pages out-of-the-box if it’s a supported site, no options needed.
Example Config File
Example Config File Walkthrough
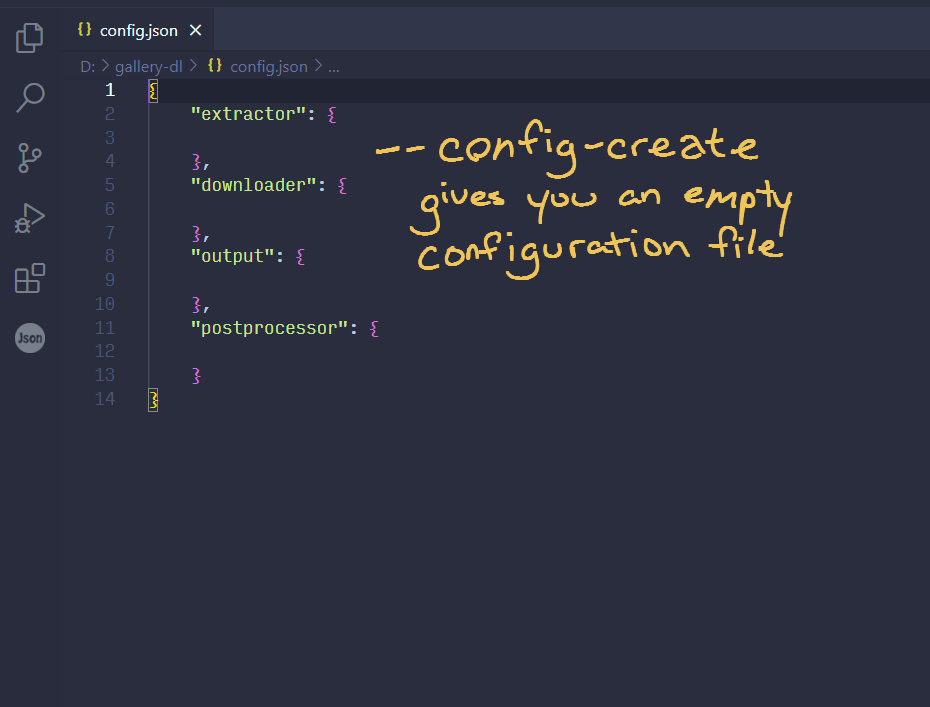
gallery-dl --config-create generates a basic, empty config file. I recommend dragging this file into VS Code for the syntax highlighting and autocompletion. You could use Notepad but you would go insane pretty fast.
{
    "extractor": {

    },
    "downloader": {

    },
    "output": {

    },
    "postprocessor": {

    }
}
Here you can see the four base types of options in gallery-dl: Extractor, Downloader, Output, and Postprocessor.
The documentation lists every configuration option in Dot Notation following this pattern from shallowest to deepest:
BASE.OPTIONBASE.category.OPTIONBASE.category.subcategory.OPTION
Each dot represents a level of nesting, which is every time we open a pair of curly braces ("{ }") inside of curly braces. Options nested deeper will override options at shallower levels.
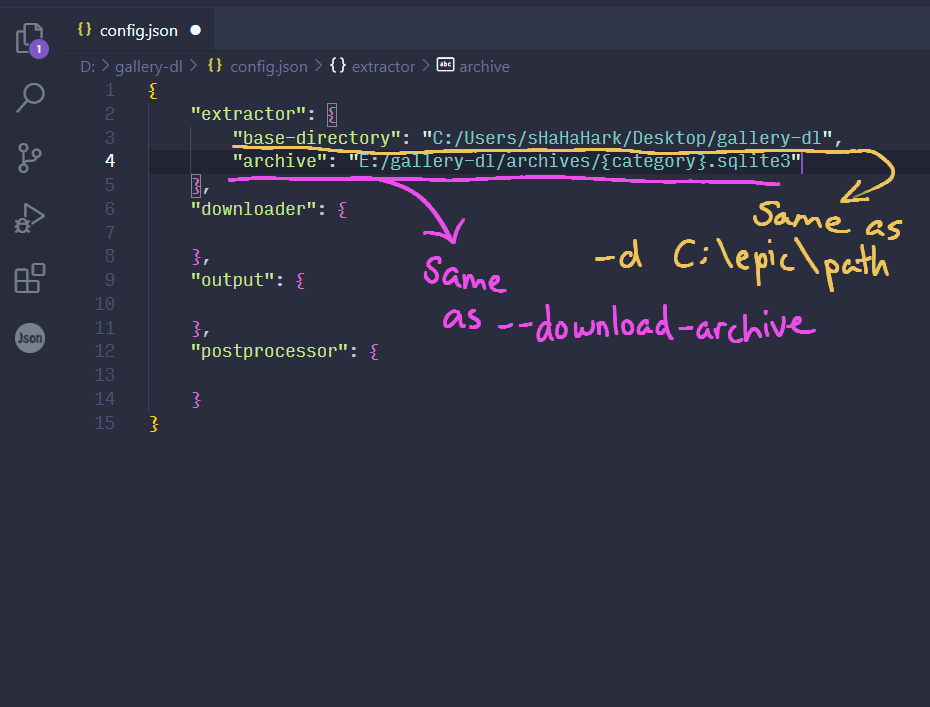
Let’s set some options at the shallowest level in Extractor.
{
    "extractor": {
        "base-directory": "C:/gallery-dl/",
        "archive": "E:/archives/{category}.sqlite3"
    },
    "downloader": {

    },
    "output": {

    },
    "postprocessor": {

    }
}
The basic idea of picking an option and passing it arguments is still true in a configuration file. In JSON format, everything is a “key–value pair.” Where in the command line we would’ve typed --destination C:\gallery-dl, in this JSON file we typed "base-directory": "C:/gallery-dl/".
Take note of the syntax as well. "keys" and "values" are always separated by a colon (":") and each key–value pair is separated by a comma (",").
You can find these options listed in the documentation as extractor.*.base-directory and extractor.*.archive. The asterisk just means this option works at any level. Because we set these options at the shallowest level (BASE.OPTION) they will apply to every URL we give to gallery-dl, as if we used them directly in the command-line.
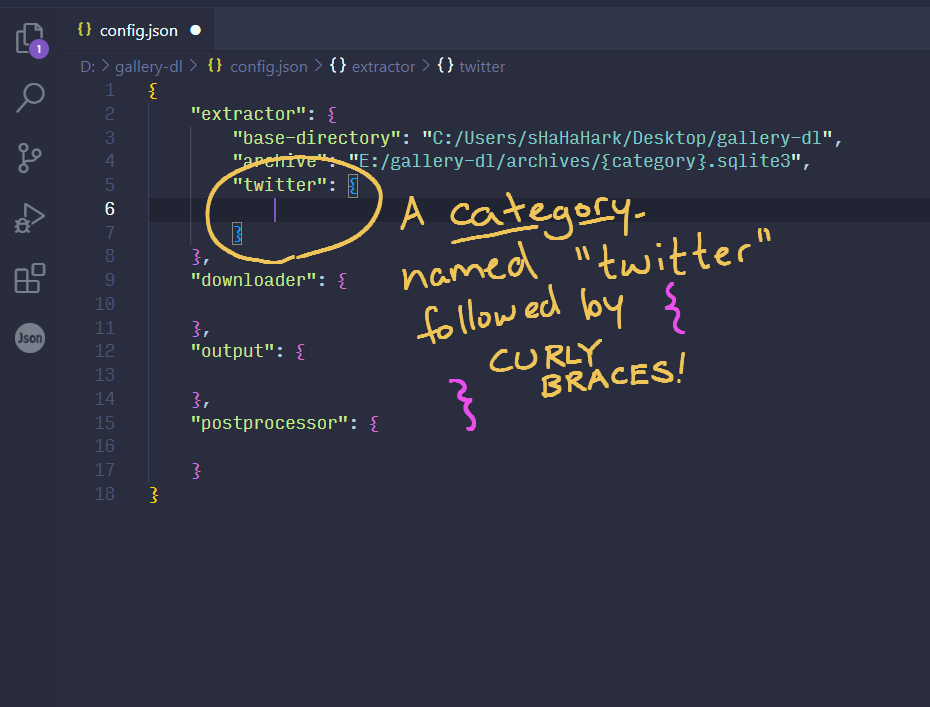
Overriding Options by Nesting Deeper
Right now our configuration file’s options will apply to every gallery-dl run. What if we wanted to set options that only applied when downloading from Twitter URLs, and others only for pixiv URLs? Well, this is where categories and subcategories of “Extractors” come in.
Using gallery-dl --list-extractors outputs a list of every extractor built in to gallery-dl along with their categories and subcategories. gallery-dl --list-extractors > C:\path\to\file.txt will write this list to a text file. To see any default values for an extractor, copy its example URL into gallery-dl -E URL.
The category of an extractor is the website name and the subcategory is the specific page on that website to which the extractor applies. So the TwitterBookmarkExtractor applies to twitter.com/i/bookmarks because its category is Twitter and its subcategory is Bookmark.
This will be easier to explain in the example configuration file.
{
    "extractor": {
        "base-directory": "C:/gallery-dl/",
        "archive": "C:/gallery-dl/archives/{category}.sqlite3",
        "twitter": {
            "base-directory": "D:/pics/",
            "username": "sHaHaHark",
            "password": "IL0V3_4M3!"
        },
        "pixiv": {

        }
    },
    "downloader": {

    },
    "output": {

    },
    "postprocessor": {

    }
}
We’ve added two more key–value pairs with the "twitter" and "pixiv" categories as keys, and their values are something known as Objects. An Object is just a pair of curly braces containing a list of zero or more key–value pairs. The Twitter object has some key–value pairs, while the Pixiv object is still empty.
Because we opened a pair of curly braces inside of curly braces, we’ve just nested these options one level deeper.
The options set inside the Twitter object are at the BASE.category.OPTION level. They will apply to all twitter.com URLs and only those URLs. So if we ran
gallery-dl -c config.json https://www.instagram.com/p/C4ZkeNaxeVW/ https://twitter.com/ayunda_risu/status/1767396377116713245Then the video from Instagram would save to C:\gallery-dl while the video from Twitter would save to D:\pics.
We can still nest one level deeper with subcategories.
{
"extractor": {
"base-directory": "C:/gallery-dl/",
"archive": "C:/gallery-dl/archives/{category}.sqlite3",
"twitter": {
"base-directory": "D:/pics/",
"username": "sHaHaHark",
"password": "IL0V3_4M3!",
"bookmark": {
"base-directory": "E:/not porn/",
"videos": false
},
"likes": {
"directory": ["{category}", "{user[name]}", "likes"],
"videos": false
},
"media": {
"directory": ["{category}", "{user[name]}", "media"],
"quoted": true
}
},
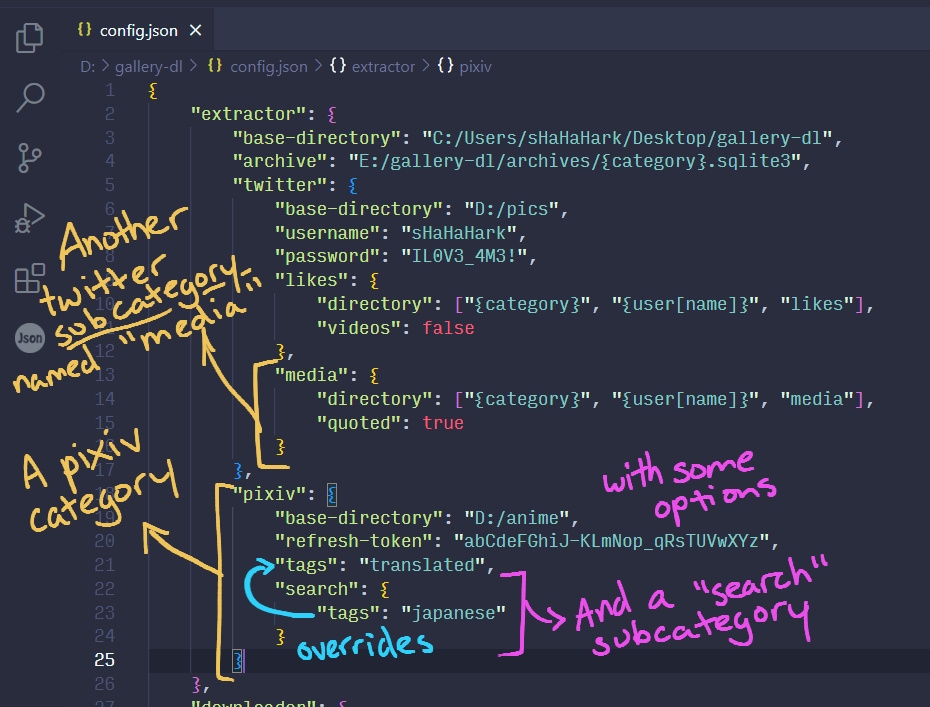
"pixiv": {
"base-directory": "D:/pics/anime/",
"include": ["avatar", "background", "artworks"],
"tags": "translated",
"work": {
"related": true
},
"metadata": true,
"max-posts": 25
}
},
"downloader": {
},
"output": {
},
"postprocessor": {
}
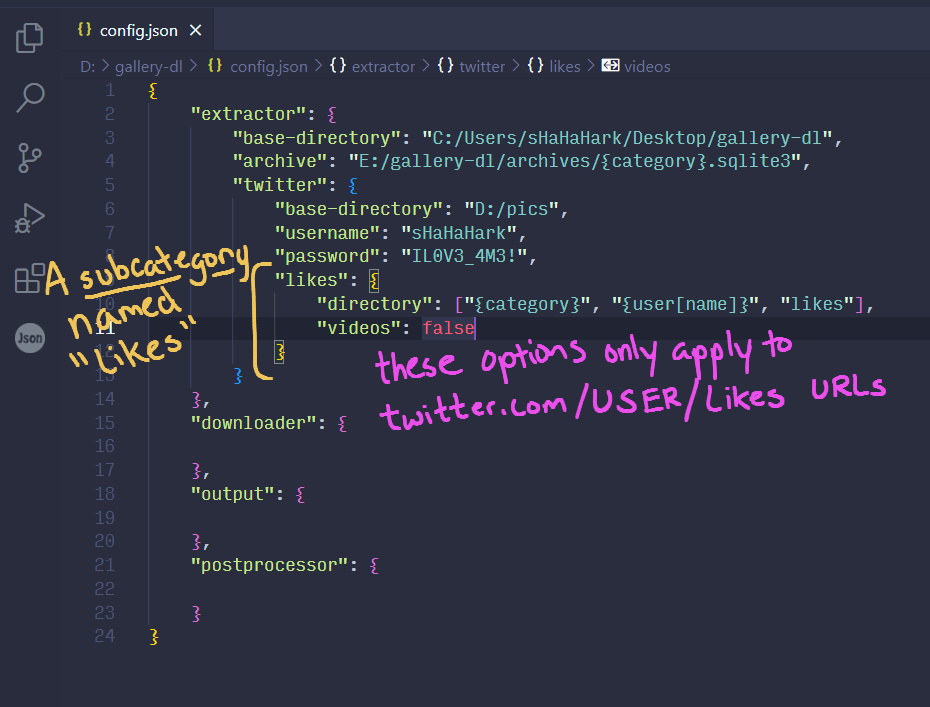
}Hopefully you see the pattern by now. We added 3 subcategories to Twitter, each with their own options. Subcategories apply to specific pages on a website. The options in the "bookmark": {…} object only apply to twitter.com/i/bookmarks URLs, "media": {…} to twitter.com/USER/media URLs, and "likes": {…} to twitter.com/USER/likes URLs.
And again, deeper options override shallower options. Your bookmarks will be downloaded to E:\not porn rather than D:\pics, but media and likes will still be going to D:\pics, and files from other websites will go to C:\gallery-dl.
To really drive the point home, here is a config file but with its structure spelled out explicitly.
{
    "BASE": {
        "option": "argument",
        "option": "argument",
        "CATEGORY": {
            "option": "argument",
            "option": "argument",
            "option": ["ar", "gu", "ment"],
            "SUBCATEGORY": {
                "option": "argument",
                "option": true
            },
            "SUBCATEGORY": {
                "option": ["ar", "gu", "ment"],
                "option": false
            }
        },
        "CATEGORY": {
            "option": "argument",
            "option": ["arg", "ume", "nt"],
            "SUBCATEGORY": {
                "option": true
            },
            "option": true,
            "option": 25
        }
    },
    "BASE": {

    },
    "BASE": {

    },
    "BASE": {

    }
}
Quick Recap!
- Everything in JSON is a key–value pair
- There are four base types of options: Extractor, Downloader, Output, Postprocessor
- Options can be set at three levels: Base, Category, Subcategory
- Options at deeper levels override shallower levels.
- For extractor options:
- base options apply to all URLs
- categories apply sitewide
- subcategories apply to a specific page.
--list-extractorslists all Extractors’ categories and subcategories-E URLlists default option values for a particular page’s Extractor- In the documentation, the levels are represented with Dot Notation
- In JSON the levels are represented by the nesting of curly braces, a.k.a. named objects
Data Types
The last thing you need to know about JSON are data types. In the config documentation, every option lists what data type(s) it is written in.
- String
- A string is literally any string of characters wrapped in double quotes (
"…") or single quotes ('…').{ "username": "sHaHaHark", "proxy": "192.168.178.20" } - Number
- Includes integers (1, 2, 3) and floats (1.000, 2.5, 3.1415). Just digits and decimal separators, no quotes!
{ "retries": 5, "timeout": 27.3 } - Boolean
- True or False
{ "image-unique": true, "fallback": false } - List / Array
- A list is a pair of square brackets containing an ordered list of one or more values of any data type separated by commas.
{ "retry-codes": [404, 429, 430], "directory": ["{category}", "{manga}", "c{chapter} - {title}"], "postprocessors": [ { "name": "zip", "compression": "store" }, { "name": "exec", "command": ["/home/foobar/script", "{category}", "{image_id}"] } ] } - Object
- An object is a pair of curly braces containing an unordered list of key–value pairs.
{
    "extension-map": {
        "jpeg": "jpg",
        "jpe": "jpg",
        "jfif": "jpg",
        "jif": "jpg",
        "jfi": "jpg"
    }
}
Downloader and Output Options
Downloader and Output options follow the exact same pattern as the Extractor options we’ve been looking at. There are no command-line options like --list-extractors which will show the categories and subcategories for Downloader, Output, or Postprocessor options, you can only find it listed in the documentation in dot notation.
Downloader options can be used to set download rate, proxy servers, size of packets, request headers, etc. Probably not something you need to touch unless your Internet isn’t that great, or you’re bored.
Output options affect the text that is output to Command Prompt’s terminal window. This is the information that also gets written to log files if you set the option to do so. You can customize a progress bar with format strings and with some effort you can color code output to your liking to help you read it. This is mostly quality of life stuff and doesn’t directly affect downloading your files.
Postprocessor Options
Postprocessor options handle everything done to your files after they’ve been downloaded. There are a handful of options for detecting and deleting duplicate files, a ton of options for handling a file’s metadata, a few for running the files through Python commands of your choosing, several for using ffmpeg to convert Pixiv’s “ugoira” format to gif or video, and another handful of options for handling ZIP archives.
Postprocessor options are declared a bit differently than the rest. I think this will be better explained in a separate guide. If you read the documentation keeping in mind the JSON concepts you have learned here, and google for a few examples shared on Reddit, I think you will be able to figure it out though.